模块 0:Cocos Creator → Unity 迁移对照
Day 1 ⏱ 预计阅读 1.5 小时
帮助有 Cocos Creator 2D 经验的开发者快速建立 Unity 的概念映射。每一项都给出 Cocos(TypeScript)和 Unity(C#)的并排完整代码。
引言:为什么学对照比从零学更快
你已经在 Cocos Creator 中掌握了游戏开发的核心概念:节点树、组件模式、游戏循环、Prefab、坐标系、资源加载。Unity 的底层逻辑完全一致,只是 API 命名、编辑器布局、语言(TypeScript → C#)不同。
本模块采用「先说你已经懂的,再告诉你 Unity 里怎么写」的策略。
0.1 编辑器概念对照
两个引擎的编辑器布局非常相似,但名称和细节不同:
| Cocos Creator | Unity | 说明 |
|---|---|---|
| 场景编辑器(Canvas) | Scene View | 可视化编辑场景中物体的位置、大小、旋转 |
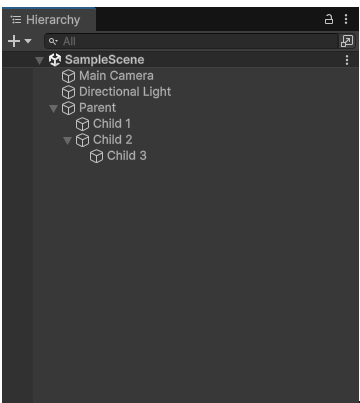
| 层级管理器 | Hierarchy 窗口 | 树状显示场景中所有节点/GameObject 的父子关系 |
| 属性检查器 | Inspector 窗口 | 选中物体后显示并编辑其所有组件属性 |
| 资源管理器 | Project 窗口 | 浏览 Assets/ 目录下所有资源文件 |
| 控制台 | Console 窗口 | 显示 Log/Warning/Error 输出 |
| 节点(Node) | GameObject | 场景中的一个实体对象 |
| 组件(Component) | Component / MonoBehaviour | 挂载到节点上的功能模块 |
| 场景(.fire) | Scene(.unity) | 一个游戏关卡/画面的数据文件 |
| 预制体(.prefab) | Prefab(.prefab) | 可复用的节点/GameObject 模板 |
| 构建发布 | Build Settings → Build | 打包发布到目标平台 |
Cocos 的节点默认有 UITransform 组件(2D),Unity 的 GameObject 默认有 Transform 组件(3D)。在 Unity 中做 2D 游戏时,使用 SpriteRenderer 和 RectTransform(UI)。
0.2 组件化架构对照
两个引擎都采用组合优于继承的组件模式,但语法完全不同。
添加与获取组件
// === Cocos Creator (TypeScript) ===
import { _decorator, Component, Sprite } from 'cc';
const { ccclass, property } = _decorator;

@ccclass('Player')
export class Player extends Component {
    onLoad() {
        // 获取已有的 Sprite 组件
        let sprite = this.node.getComponent(Sprite);
        // 添加新的组件
        let col = this.node.addComponent(BoxCollider2D);
    }
}
// === Unity (C#) ===
using UnityEngine;
public class Player : MonoBehaviour
{
void Awake()
{
// 获取已有的 SpriteRenderer 组件
SpriteRenderer sprite = GetComponent<SpriteRenderer>();
// 添加新的组件
BoxCollider col = gameObject.AddComponent<BoxCollider>();
}
}装饰器 vs 特性(Attribute)
| Cocos(装饰器) | Unity(Attribute) | 作用 |
|---|---|---|
@ccclass('Name') | 无需标记 | 注册为可序列化类 |
@property(Node) | public GameObject target; | Inspector 中可拖拽赋值 |
@property({ type: CCInteger }) | public int hp = 100; | 类型化 Inspector 字段 |
@property({ visible: false }) | [HideInInspector] public int x; | 隐藏字段 |
@property({ min: 0, max: 100 }) | [Range(0, 100)] public float x; | 限制数值范围 |
@property({ tooltip: '...' }) | [Tooltip("...")] public int x; | 鼠标悬停提示 |
完整对照:一个带属性的组件
// === Cocos Creator ===
@ccclass('FarmManager')
export class FarmManager extends Component {
    @property(Node)
    playerNode: Node = null;
    @property({ type: Prefab })
    cropPrefab: Prefab = null;
    @property
    gold: number = 100;
    @property({ min: 1, max: 10 })
    cropGrowSpeed: number = 3;

    start() {
        let crop = instantiate(this.cropPrefab);
        crop.setParent(this.node);
    }
}
// === Unity (C#) ===
public class FarmManager : MonoBehaviour
{
public GameObject playerNode; // 拖拽赋值
public GameObject cropPrefab; // 拖拽 Prefab 赋值
public int gold = 100;
[Range(1, 10)]
public float cropGrowSpeed = 3f;
void Start()
{
GameObject crop = Instantiate(cropPrefab);
crop.transform.SetParent(transform);
}
}Cocos 中 @property 显式标记要暴露的字段;Unity 中 public 字段自动暴露,private 字段需要加 [SerializeField] 才能暴露。
0.3 生命周期对照
这是迁移时最重要的概念。两个引擎的游戏循环逻辑完全一致,只是方法名不同:
| Cocos Creator | Unity | 时机 |
|---|---|---|
onLoad() | Awake() | 对象被创建/激活时立即调用,初始化自身引用 |
onEnable() | OnEnable() | 组件启用时(每次 setActive(true) 都触发) |
start() | Start() | 第一次 update 之前调用一次 |
update(dt) | Update() | 每帧调用,dt = Time.deltaTime |
lateUpdate() | LateUpdate() | 所有 Update 之后,适合跟随相机 |
onDisable() | OnDisable() | 组件被禁用/对象被隐藏时 |
onDestroy() | OnDestroy() | 对象被销毁时 |
生命周期执行顺序图
Unity MonoBehaviour 生命周期执行顺序图
完整生命周期代码对照
// === Cocos Creator ===
@ccclass('LifeDemo')
export class LifeDemo extends Component {
    onLoad()      { console.log('onLoad'); }
    onEnable()    { console.log('onEnable'); }
    start()       { console.log('start'); }
    update(dt)    { // dt = 帧间隔(秒)
        this.node.setPosition(this.node.position.x + 100 * dt, this.node.position.y);
    }
    lateUpdate()  {}
    onDisable()   { console.log('onDisable'); }
    onDestroy()   { console.log('onDestroy'); }
}
// === Unity (C#) ===
using UnityEngine;
public class LifeDemo : MonoBehaviour
{
void Awake() { Debug.Log("Awake"); }
void OnEnable() { Debug.Log("OnEnable"); }
void Start() { Debug.Log("Start"); }
void Update() {
// Time.deltaTime 等价于 Cocos 的 dt
transform.position += new Vector3(100f * Time.deltaTime, 0, 0);
}
void LateUpdate() {}
void OnDisable() { Debug.Log("OnDisable"); }
void OnDestroy() { Debug.Log("OnDestroy"); }
}所有 Awake 先执行完,再执行所有 Start。如果 A 的 Awake 中引用 B 脚本,而 B 还没 Awake,会拿到 null。把依赖其他组件的初始化放在 Start 里更安全——和 Cocos 的 onLoad/start 完全一致。
0.4 Prefab 对照
Prefab(预制体)概念完全相同:把配置好的对象保存为模板,运行时动态创建实例。
| 操作 | Cocos Creator | Unity |
|---|---|---|
| 创建 Prefab | 节点拖到资源管理器 | GameObject 拖到 Project 窗口 |
| 代码中引用 | @property(Prefab) 拖拽 | public GameObject prefab; 拖拽 |
| 实例化 | instantiate(prefab) | Instantiate(prefab) |
| 设父节点 | node.setParent(parent) | obj.transform.SetParent(parent) |
| 销毁 | node.destroy() | Destroy(obj) |
| Prefab 变体 | 不支持 | Prefab Variant(继承并覆盖) |
完整代码:动态生成农作物
// Cocos Creator
@property({ type: Prefab })
cropPrefab: Prefab = null;

spawnCrop(x, y) {
    let crop = instantiate(this.cropPrefab);
    crop.setPosition(new Vec3(x, y, 0));
    crop.setParent(this.node);
}
// Unity (C#)
public GameObject cropPrefab; // Inspector 拖拽
public void SpawnCrop(float x, float z) {
GameObject crop = Instantiate(cropPrefab);
crop.transform.position = new Vector3(x, 0f, z);
crop.transform.SetParent(transform);
}0.5 坐标系与变换对照
这是从 Cocos 2D → Unity 3D 迁移时最大的思维转变。
Cocos Creator 2D vs Unity 3D 坐标系对比
| 概念 | Cocos 2D | Unity 3D |
|---|---|---|
| 维度 | 2D:(x, y) | 3D:(x, y, z) |
| Z 轴 | 节点排序(越小越前) | 深度轴(Z+ 朝屏幕外/前方) |
| 位置 | node.position(相对父) | localPosition(相对父)position(世界坐标) |
| 旋转 | angle: number(Z 轴度数) | rotation: QuaternioneulerAngles: Vector3 |
| 缩放 | scale: Vec3 | localScale: Vector3 |
| 锚点 | anchorPoint (0~1) | Transform 无锚点;UI 用 RectTransform.pivot |
在 Cocos 2D 中只关心 (x, y);Unity 3D 中地面是 XZ 平面(Y 为高度)。农场游戏中,地块排列是 X 和 Z 方向,Y = 0 是地面。
位置与旋转代码对照
// Cocos Creator
this.node.setPosition(new Vec3(100, 200, 0));
this.node.setRotationFromEuler(0, 0, 45);
this.node.setScale(new Vec3(2, 2, 1));
// Unity (C#)
transform.position = new Vector3(100f, 200f, 0f);
transform.localPosition = new Vector3(5f, 0f, 0f);
transform.rotation = Quaternion.Euler(0f, 45f, 0f);
transform.localScale = new Vector3(2f, 2f, 2f);0.6 资源加载方式对照
| 场景 | Cocos Creator | Unity |
|---|---|---|
| Inspector 拖拽 | @property(SpriteFrame) | public Sprite sprite; |
| Resources 加载 | resources.load(path, type, cb) | Resources.Load<T>("path") |
| 异步加载 | 回调 或 assetManager.loadAny() | Addressables / 协程 |
| 远程资源 | assetManager.loadRemote(url) | UnityWebRequest |
| 释放资源 | assetManager.releaseAsset() | Resources.UnloadUnusedAssets() |
// Cocos Creator
resources.load('textures/farm_bg/spriteFrame', SpriteFrame, (err, asset) => {
    if (err) return;
    this.node.getComponent(Sprite).spriteFrame = asset;
});
// Unity (C#)
Sprite bgSprite = Resources.Load<Sprite>("textures/farm_bg");
GetComponent<SpriteRenderer>().sprite = bgSprite;
// 注意:路径不含扩展名,不含 "Resources/" 前缀Resources.Load 最简单但不推荐生产环境:无法分包、无法卸载。Addressables 是官方推荐方案,支持异步加载和分包,非常适合抖音小游戏场景(模块 2 和 4 详讲)。
0.7 输入系统对照
| 操作 | Cocos Creator | Unity |
|---|---|---|
| 触摸/点击 | node.on(TOUCH_START, cb) | Input.GetMouseButtonDown(0) |
| 键盘 | input.on(KEY_DOWN, cb) | Input.GetKeyDown(KeyCode.Space) |
| 鼠标位置 | event.getLocation() | Input.mousePosition |
| 射线检测 | 无(2D 用碰撞) | Physics.Raycast() |
// Cocos Creator
input.on(Input.EventType.KEY_DOWN, (event: EventKeyboard) => {
    if (event.keyCode === 65) console.log('A pressed');
});
this.node.on(Node.EventType.TOUCH_START, (event) => {
    let pos = event.getLocation();
});
// Unity (C#)
void Update()
{
if (Input.GetKeyDown(KeyCode.A))
Debug.Log("A pressed");
if (Input.GetKey(KeyCode.W))
transform.Translate(Vector3.forward * 5f * Time.deltaTime);
if (Input.GetMouseButtonDown(0))
{
Ray ray = Camera.main.ScreenPointToRay(Input.mousePosition);
if (Physics.Raycast(ray, out RaycastHit hit))
Debug.Log($"Hit: {hit.collider.gameObject.name}");
}
}0.8 场景管理对照
| 操作 | Cocos Creator | Unity |
|---|---|---|
| 加载场景 | director.loadScene('name') | SceneManager.LoadScene("name") |
| 异步加载 | director.preloadScene() | SceneManager.LoadSceneAsync("name") |
| 跨场景保留 | game.addPersistRootNode(node) | DontDestroyOnLoad(gameObject) |
| 场景注册 | 构建面板注册 | Build Settings → Add Open Scenes |
// Cocos Creator
director.loadScene('farm', () => { console.log('加载完成'); });
// Unity (C#) — 异步加载+进度条
IEnumerator LoadSceneAsync()
{
AsyncOperation op = SceneManager.LoadSceneAsync("Farm");
op.allowSceneActivation = false;
while (!op.isDone)
{
float progress = Mathf.Clamp01(op.progress / 0.9f);
Debug.Log($"Loading: {progress * 100}%");
if (op.progress >= 0.9f) op.allowSceneActivation = true;
yield return null;
}
}
DontDestroyOnLoad(gameObject); // 跨场景保留0.9 迁移速查总表
这张表是你迁移过程中最常用的参考。建议收藏本页。
| 类别 | Cocos Creator (TS) | Unity (C#) |
|---|---|---|
| 导入 | import { X } from 'cc' | using UnityEngine; |
| 类声明 | @ccclass class X extends Component | public class X : MonoBehaviour |
| 获取组件 | this.node.getComponent(X) | GetComponent<X>() |
| 添加组件 | this.node.addComponent(X) | gameObject.AddComponent<X>() |
| 子节点 | this.node.children | transform.childCount / GetChild(i) |
| 查找节点 | find('path/to/node') | GameObject.Find("path") |
| 激活/禁用 | this.node.active = true | gameObject.SetActive(true) |
| 帧间隔 | update(dt) 参数 | Time.deltaTime 属性 |
| 定时器 | this.schedule(cb, interval) | InvokeRepeating() 或协程 |
| 延时 | this.scheduleOnce(cb, delay) | Invoke("M", delay) 或协程 |
| 实例化 | instantiate(prefab) | Instantiate(prefab) |
| 销毁 | node.destroy() | Destroy(gameObject) |
| 日志 | console.log() | Debug.Log() |
| 协程 | schedule/scheduleOnce | StartCoroutine(Fn()) |
| 向量 | new Vec3(x, y, z) | new Vector3(x, y, z) |
| 加载场景 | director.loadScene('name') | SceneManager.LoadScene("name") |
| 加载资源 | resources.load(path, type, cb) | Resources.Load<T>(path) |
| 常驻节点 | game.addPersistRootNode() | DontDestroyOnLoad() |
| 碰撞体 | Collider2D | BoxCollider / SphereCollider |
| 刚体 | RigidBody2D | Rigidbody |
| 碰撞回调 | onBeginContact | OnCollisionEnter / OnTriggerEnter |
| 射线检测 | physicsManager.raycast() | Physics.Raycast() |
| 音频 | AudioSource / AudioClip | AudioSource / AudioClip(一致) |
| 动画 | Animation / AnimationClip | Animator / AnimationClip |
- ✅ 理解 Unity 节点树 = Hierarchy 中的父子关系
- ✅ 理解组件模式 = MonoBehaviour 挂载到 GameObject
- ✅ 记住生命周期映射:onLoad→Awake, start→Start, update→Update
- ✅ 理解 3D 坐标系(XZ 平面为地面,Y 为高度)
- ✅ 知道 Prefab 用法一致:拖拽 + Instantiate
- ✅ 知道输入系统用 Input.GetKey / Input.GetMouseButton
准备好了?进入 模块 1:Unity 编辑器 + C# 完整入门 →